
What is a document camera and how do I use it?
What is a Document Camera?
A document camera is similar to an overhead transparency projector, but offers much more flexibility and eliminates the need for the creation of overhead slides. A document camera allows users to project documents and other objects on a screen or television.
Please note this guide references the Epson DC-10s document camera. Though many functions discussed in this guide are similar to other Epson models, locations of buttons and functions may differ.
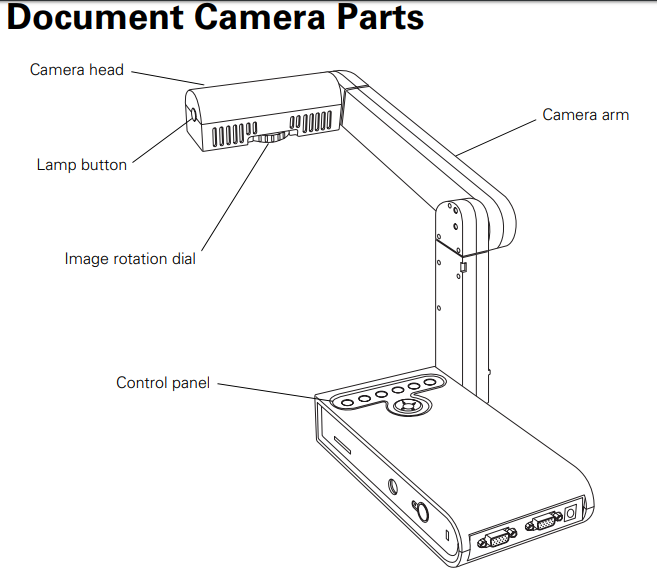
Camera Head
Where the camera is housed. Can be rotated to adjust viewing angle of image.
Camera Arm
Houses the camera head. Can be moved to adjust the height and angle of camera. Please do not push or pull the arm with too much force, as it can break.
Image Rotation
Dial Adjusts the orientation the image is viewed at. Can be twisted 180 degrees.
Lamp Button
Turns the built-in lamp on and off, providing more light.
Control Panel
Adjusts various settings on the document camera.
Side Panel
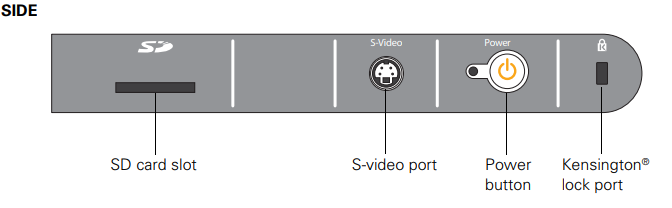
Side Panel
SD Card Slot
Allows use of an SD card containing JPEGs to be shown as a slideshow.
S-Video Port
Not used.
Power Button
Turns the document camera on and off. A green light indicates camera is on.
Kensington Lock Port
Not used.
TO TURN ON DOCUMENT CAMERA
Turn on the Data Projector.
Select the Computer 1 or Computer 2 input using the projector remote (input varies based on setup).
Turn the document camera on using the Power button.
An image will display on the projector. ADJUSTING DOCUMENT CAMERA FUNCTIONS
ADJUSTING DOCUMENT CAMERA FUNCTIONS
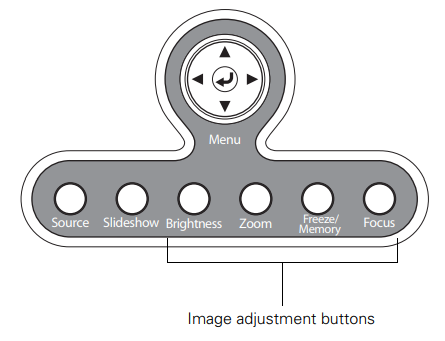
Menu
Accesses the system menu where other functions can be used and settings can be adjusted. Open menu with Enter button in the center, navigate with the Arrow keys, select an item with the Enter button.
Slideshow
Activates slideshow mode, which displays images saved on the Document Camera. Select desired images to be shown with Arrow and Enter keys.
Source
Switches between the Document Camera and PC display.
Brightness
Adjusts the image brightness. Press button until desired brightness is reached. Does not adjust lamp brightness.
Zoom
Zooms the camera in. Press button until desired zoom is reached.
Freeze/Memory
Freezes the current image. Tap button to temporarily save the image, hold button to save it into the system memory (a message will display stating image has been saved). Saving into system memory allows the image to be displayed in Slideshow mode. Tap the button again to return to normal mode.
Focus
Automatically focuses the camera, making the image clearer.
MENU FUNCTIONS
Color/Black & White
Switches displayed image between color and grayscale.
Invert
Inverts all colors, creating a negative effect.
White Balance
Adjusts color warmth. If colors look washed out, use this setting to adjust. Default is Auto.
Split Screen
Allows images from two sources to be displayed. Can display images from camera, memory, or SD card. Use the Arrow keys to select each side desired image should be displayed on, press Enter, and select the source. When both sides have desired content selected, select Display Split Screen and press Enter. To exit Split Screen mode, press Enter.
Memory
Displays images in system memory. Similar function to Slideshow button.
SD Card
Displays images on inserted SD card.
Language
Sets menu language. Default is English
AC Frequency
Not used.
Exit Menu
Exits system menu.
Image Source: http://files.support.epson.com/pdf/dc10s_/dc10s_ug.pdf